
7 Creative DIY Projects For Your Child To Try
With the end of summer holidays around the corner, here are some simple and fun DIY projects for your child to try during the last leg of summer!
From repurposing old shoeboxes to inculcating a gardening habit, these DIY ideas could be a lifesaver for parents running out of activities to keep their kids occupied with, as the holidays wind down. :)
A Note of Caution: These DIY activities should be performed under Parental Supervision, especially in case of activities requiring the use of scissors, small objects etc.
1. Glitter Jar Snow Globe:
Snow globes always carry a bit of magic and sparkle with them, whether they are big or small, simple or elaborate. They make great gifts, and are a perfect way to tell someone you’re thinking of them!

These DIY glitter globes are simple to make and require the following – A jar with a flat lid, a figurine, glitter, water-resistant glue and water. All you need to do is firmly glue the figurine to the lid, sprinkle glitter at the base of the jar, add water to the jar, and glue the lid on tightly to the jar. Just give it a shake and let it snow!
Here are step-by-step instructions: http://blog.modcloth.com/2011/12/23/let-it-snow-globe-how-to-make-your-own-diy-snow-globe/
Snow globes can also serve as quirky memoirs of your travels – Just use a souvenir from your last trip as the figurine and watch the magic!
2. Puzzle/ Button Wall Art:
Involve your kids in creating up cycled wall art for their room and watch your little artists churn out masterpieces!

Re-cycle old or incomplete puzzle sets to create a colourful piece of abstract art. All you need is canvas, puzzle pieces and glue – Get your kids to sort and lay out the pieces on canvas either by colour or in a mishmash of vibrant shades; glue the arrangement onto the canvas and you have your wall art!
You could even substitute puzzle pieces with colourful buttons to make Button Wall Art. Here’s a guide to making the same: http://www.simplydesigning.net/kids-craft-button-art/
Caution: Please supervise younger children during this activity as it involves small objects which could potentially be swallowed.
3. Shoebox Lid Wall Art:
Old shoeboxes clogging up your storage cabinets? How about you get your kids to transform them into a work of art for the home!

An assortment of shoe box lids of various sizes, a chevron pattern stencil, tape and spray paint are what you need for this project.
Cover the shoebox lids with white spray paint. Once dry, trace the chevron pattern onto the lids and mask the pattern with tape. Now, spray paint the lids in solid colors and remove the masking tape. Voila! Your chevron themed wall art is ready to display.
For further instructions, refer to this tutorial: http://spunkyjunky.blogspot.in/2011/03/tutorial-tuesday-chevron-shoebox-wall.html
4. Decoupage Storage/ Gift Boxes:
Fancy another innovative use for those old shoeboxes gathering dust in your cupboard? Decoupage to the rescue!

The latest technique to take the craft world by storm, Decoupage is the art of adorning an object by gluing paper cut-outs onto varied surfaces. This could range from wooden or paper boxes, metal tins to glass jars and bottles.
Infuse a new breath of life into old shoeboxes by getting your kids to decoupage onto them!
Cut out pictures from old magazines, newspapers, pretty wrapping paper, greeting cards or other sources. Dilute glue with a little water and use a paintbrush to apply glue onto the picture cutouts. Stick the cutouts onto the shoebox surface and use a popsicle stick to smooth out any creases or wrinkles.
Once the glue dries completely, apply extra coats of the glue to create a glossy, finished effect. Alternatively, you could use a decoupage medium such as Mod Podge which works as an all-in-one glue, sealer and finish, and is available at various craft stores.
For a detailed tutorial on how to decoupage, refer to this link: http://o5.com/7-easy-steps-for-decoupage-projects
5. Mason Jar Candle Votives/ Vases:
These lovely little votives are simple to make – You need a glass jar, glue, light floral or printed fabric, scissors, a paint brush and a small cup.
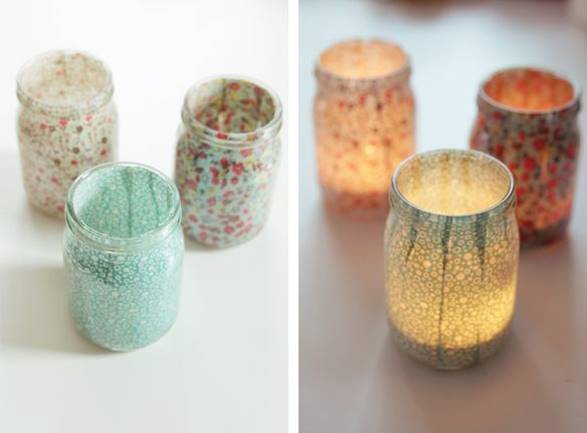
Measure the Mason jar to estimate the approximate length and width of the fabric strips required to line the inside of the jar and cut strips accordingly. Dilute the glue with a little water in the cup and dip a fabric strip in the cup, removing any excess glue. Glue the strips from the inside of the jar with the pattern side facing the jar, using the paintbrush to smoothen out any creases.
Once fully dry, place a battery-operated tea light in the jar and you’re all set!
Here are the step-by-step instructions: http://fellowfellow.com/sweet-diy-votives/
Caution: Please use only battery-operated candles and not real candles as the fabric lining is inflammable.
These votives also double up as adorable vases – Add some artificial flowers and pop the vase in the middle of your table for a lovely centerpiece!
6. Inspiration Board/ Photo Montage:
Ensure your child always has a healthy dose of inspiration at hand with these easy-to-make inspiration boards.

Use an old bulletin board, or line a cork board with coloured fabric and frame the board. Get your kids to use push pins to put up things that inspire them onto the board – Right from printouts of motivating quotes to handwritten life goals to an image of a treasured memory or a hand-made painting!
Hang the board on the wall near the child’s study table or in a favorite corner of the bedroom. Update the board frequently for a slice of fresh inspiration!
Another easy way to brighten up your kid’s room and add a personal touch, the photo montage below is a breeze to make!

Just string a few rows of wire to the back of an empty frame, and get your child to arrange chosen photographs by clipping them onto the wires using mini clothespins or other clips.
Caution: Nailing/ attaching the wires onto the back of the frame should be performed by an adult.
To add a little more sparkle, your child could paint the frame or you could string fairy lights along the edge of the frame.
Here’s the link to a tutorial for an Instagram Photo Display:
http://littleinspiration.com/2013/04/instagram-project-how-to-display-your-instagram-pictures.html
7. Recycled Tin Herb Planters:
Sow the seeds of a gardening habit in your kids with these easy-to-make recycled planters. We loved the idea of using vintage tins to plant herbs; alternatively succulents are a low-maintenance option to get your little gardeners started!

Remove labels from the tins, clean and dry them. Use a hammer and nails to drill holes at the bottom of the tin to allow drainage of excess water.
Caution: Drilling holes in the tin to be performed by an adult.
Guide your child in potting the selected herbs in the tin - Fill the potting soil in the tin halfway and plant the herb. Fill and firm up the soil around the plant and add water. To label the herbs, paint a Popsicle stick and use a marker to write the names of the herbs on the stick. Pop the sticks vertically into the planters. Place the herb planters on a windowsill or balcony with ample sunlight and you’re good to grow!
Refer this link for detailed instructions: http://blog.modcloth.com/2014/05/06/mothers-day-diy/?crlt.pid=camp.S1g7xOOyOdjn
Which of these DIY projects would you like to get your kids started on? Any other interesting ones? Let us know!
– Written by Namratha Jagadish for The Purple Turtles.
Image Sources (In order of appearance):
http://www.byfryd.com/2012/11/right-now-2
http://babyecochic.com/es/be-green-and-eco-friendly/no-te-rompas-la-cabeza-cuadro-de-piezas-de-puzzles
http://www.simplydesigning.net/kids-craft-button-art/
http://spunkyjunky.blogspot.in/2011/03/tutorial-tuesday-chevron-shoebox-wall.html
http://o5.com/7-easy-steps-for-decoupage-projects/
http://fellowfellow.com/sweet-diy-votives
http://iheartorganizing.blogspot.in/2014/02/our-thrift-store-chair-project.html
http://littleinspiration.com/2013/04/instagram-project-how-to-display-your-instagram-pictures.html
http://www.apartmentapothecary.com/wordpress/?photo=recycled-planters
http://www.apartmenttherapy.com/gardening-on-the-cheap-tea-tin-herb-garden-191799